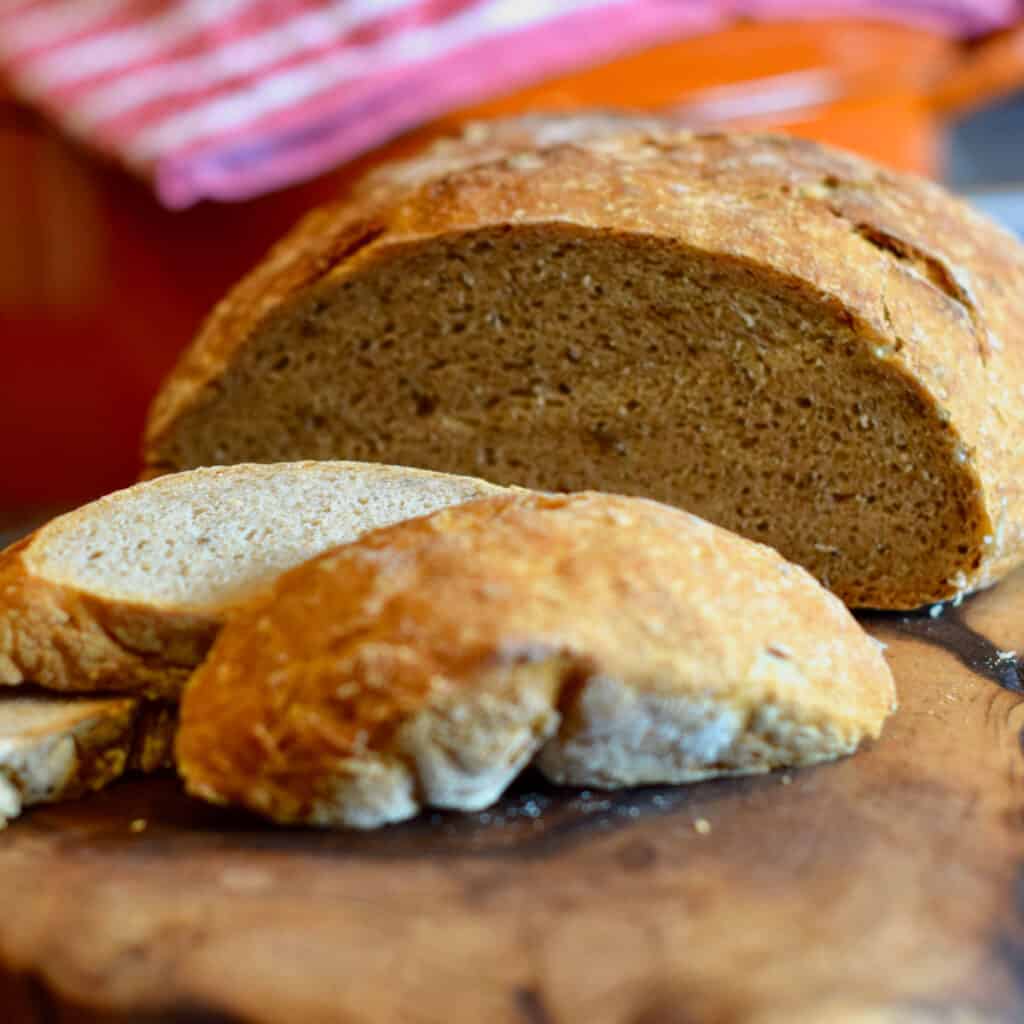
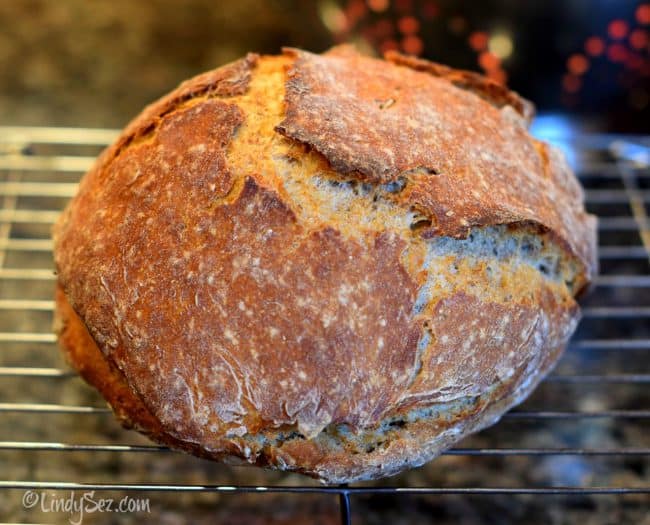
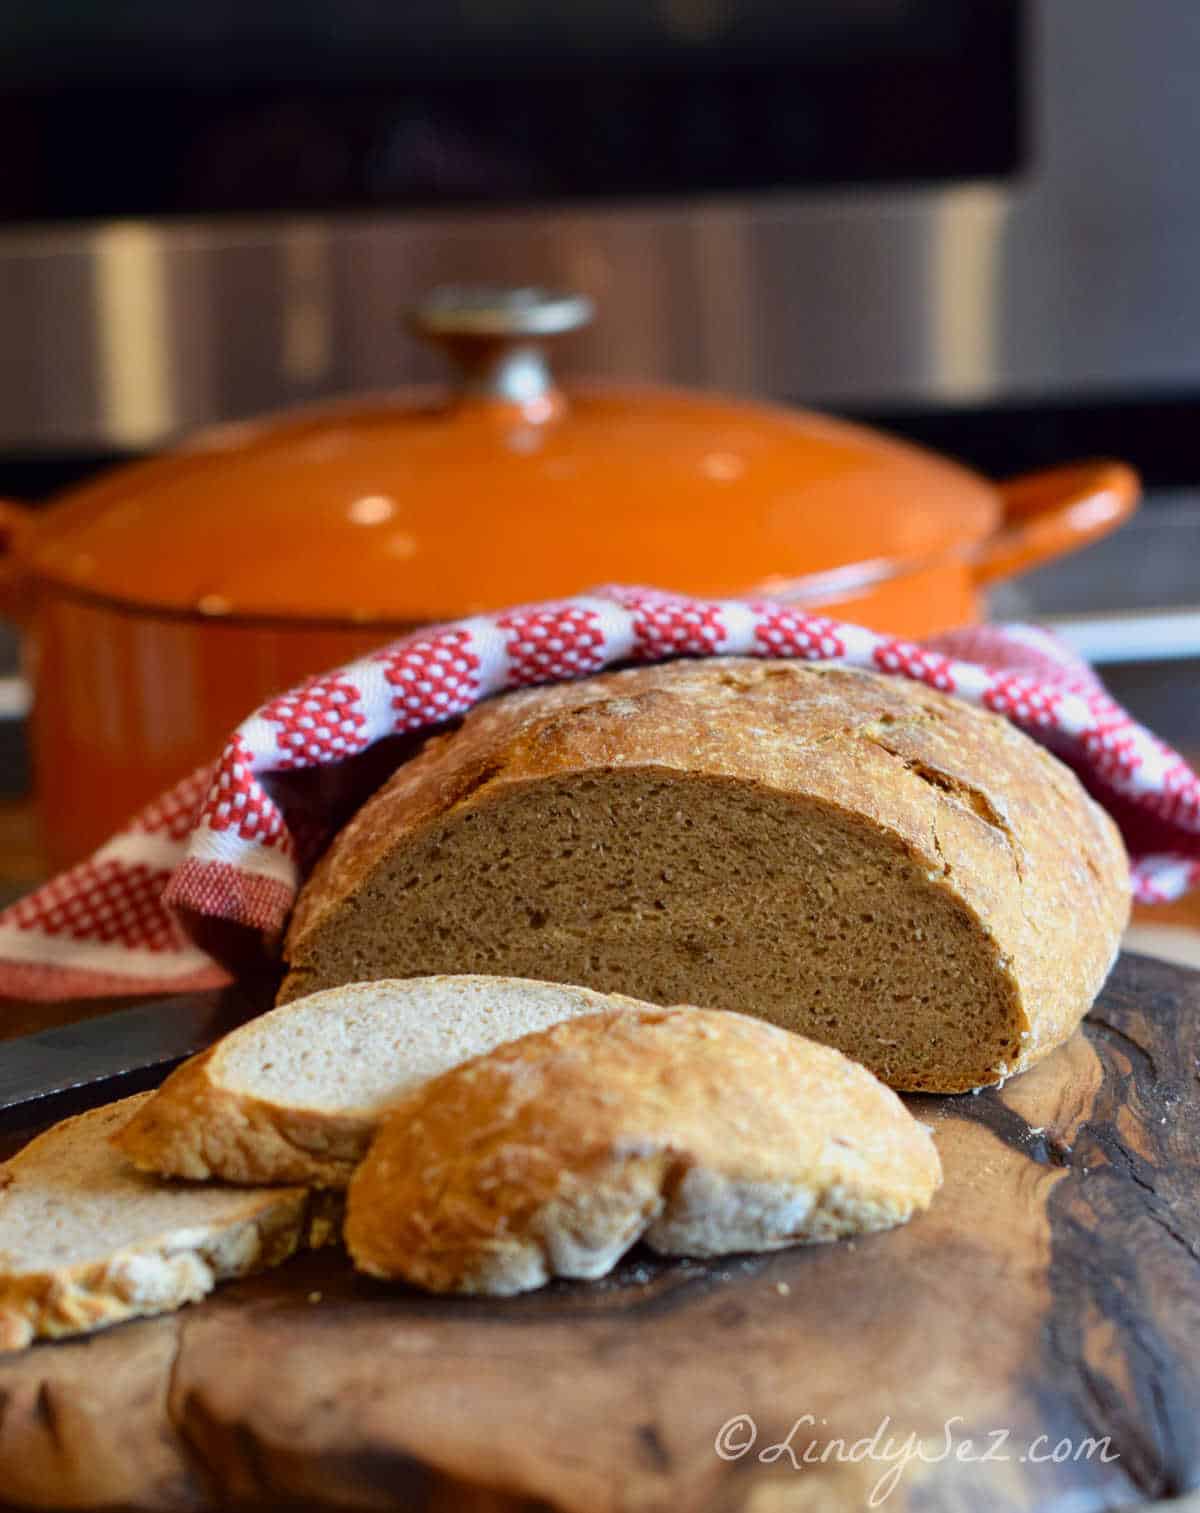
Using a Dutch oven as your 'oven' - This recipe for a quick no-knead crusty rye bread yields a beautifully crusty, dense, loaf of bread - with delicious rich rye flavor, in about 4 hours. Perfect for a Reuben sandwich, grilled patty melt, or just to toast up and eat with a pat of butter.
How to make - A Quick No-Knead Crusty Rye Bread
Why you should make this recipe
Because it makes a delicious fresh dense crusty rye bread.
My Inspiration
You can scroll past this to the ingredients list and step-by-step if you don't care about why
I love myself a good Reuben sandwich. It’s after St. Patrick’s day, and I have some left-over corned beef but once again find myself unable to find a decent rye bread. Rye bread, corned beef, sauerkraut, and Swiss cheese along with some Thousand Island dressing, grilled to crusty perfection…that’s what you need to make a Reuben.
So if you don’t have the rye, you don’t have the Reuben.
Not being able to find good rye bread is the norm here.
No Delis.
So I thought I would just make some.
My first thought was making it in my bread machine, but that wasn’t going to give me the crunchy crust I wanted, or the texture.
So to the internet, I went. I found one that promised an artisan crust by being made in a Le Creuset Dutch oven (about $350+) that had been heated before cooking.
And while it turned out good, it was a little flat. Not quite the “rise” I was looking for.
And it took 18 hours to make!
I don’t have 18 hours to wait, or I don’t have 18 hours to plan ahead…so I kept looking. I found more recipes, using varying techniques, and finally combined them to come up with this, perfectly lovely, crusty, artisan loaf of rye bread.
"You don't "need" much to make this Quick Crusty No-Knead Rye Bread"
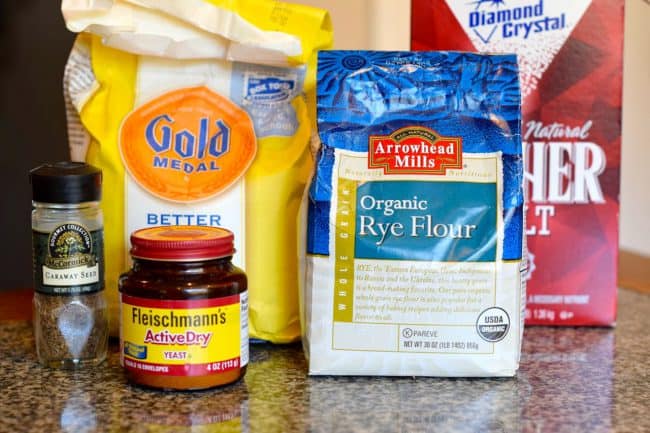
The Ingredients List
- Flour(s)- As I state in the recipe, you can use any type of flour you wish to, just know that each type will react differently and absorb the water differently. The key to the dough is to have a loose, shaggy dough. Shaggy dough means a "wet" dough.
- Rye flour - To make it rye bread.
- Active Dry Yeast- To ensure your yeast is good, you should always prove it. I like to use jarred yeast, which I keep in the refrigerator. But even with the date on it, one cannot be sure if it is alive or not. While this recipe uses no sugar in it, the best way to prove yeast is to mix a small amount of yeast along with a pinch of sugar in some warm water. Within a few minutes, you should see some vigorous bubble action. If you don't, your yeast is dead and must be replaced.
- Salt
- Caraway Seeds- caraway seeds are optional but I do like them in my rye.
- Warm Water - You want it warm, not hot. About 100º which is only slightly warmer than your body temperature. So you could use a thermometer, or just put your finger in the water. If it feels slightly warm to you, it's good to go.
Step by Step Instructions

Steps 1 and 2
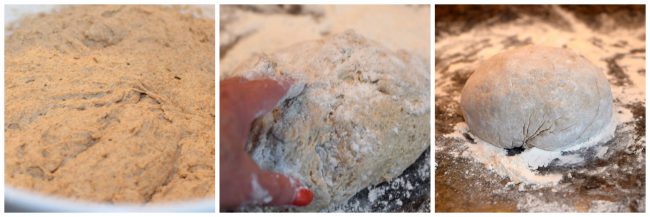
- Mix the dry dough ingredients together in a large bowl, make a well in the center and add the warm water. You will have a very shaggy dough. Remember, you want wet and shaggy.
- Cover the bowl with plastic wrap and a tea towel, and allow to rise in a warm place for about 3 hours.
Steps 3, 4, and 5
- Once the dough has risen, it should have doubled in volumn, remove it from the bowl onto a well-floured board or counter top.
- Using your well-floured hands and fold it over a few times, then form a ball sealing the bottom seam as best you can.
- Cover with plastic wrap and let it rest while your "oven" is heating.
Steps 6, 7, and 8
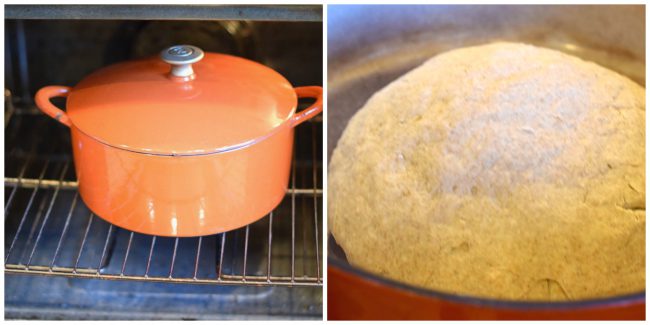
- Heat your oven to 450ºF (232ºC) and place your Dutch oven, along with the top into it to heat for at least 30 minutes - it will be very very hot.
- Remove the pot (carefully) open it and drop your ball of dough, seam side down, into the center. Cover, return to the oven and cook for 30 minutes.
- Uncover and cook 10 to 15 minutes more, or until the internal temperature reaches 200ºF (93ºC) using an instant read thermometer, OR, you can use the old fashioned way of knocking on the crust. If it sounds hollow, it should be done.
FAQ's
My preferred flour for this recipe is bread flour mixed with rye. Bread flour is softer and has more protein, which gives a more chewy texture. All-purpose white and whole-wheat flours also work well. Whole wheat, of course, would give the bread an even firmer texture, and a denser loaf and requires more water. So watch the dough and add water if it seems dry.
Remember, you want a shaggy dough, not the kind you would normally use to make bread which requires kneading.
In theory, yes. By using gluten-free flours you could make this gluten-free, however, this loaf is pretty dense when made with bread flour which is much softer, so if you use all gluten-free, I imagine it would be even more so.
Basic bread contains flour, water, salt, and yeast. There is no sugar required. Sugar will make bread rise faster and taste sweet.
There are alternatives to Le Cruset. When making this Quick No-Knead Crusty Rye Bread, I used my Lodge enameled Dutch oven (<$100) ). This pot does all the work as Le Cruset but at more than half the cost.
Just make sure to use a heavy, enameled Dutch oven so the bread comes out easily.
Try to drop the dough as close to the center of the pot as you can, but if you don't make it exactly in the center, don't panic. It will be o.k. I've even had drops that were more side drops than center drops, and the loaf turned out fine.
Do not try to move the dough once you have dropped it. Not only is it too hot for you to be putting your hands inside that pot, but the dough will stick. So just leave it where it falls. Cover and stick in the oven to cook for 30 minutes, then remove the cover, again, very carefully, and bake for about 10 minutes more, or until a thermometer registers 200º, or, use the old-fashioned knock on the bread method. If it sounds hollow, it's done.
Tips for success
1. Remember, a wet, shaggy dough. Do not think of it as a regular bread dough.
2. Make sure to preheat the Dutch oven in your hot oven for at least 30 minutes.
3. Use extreme caution when working the hot Dutch oven.
4. Your rise time may vary depending on the temperature.
- The ideal temperature to rise dough is around 85º F. Since most of us don't keep our kitchens that warm, you may need to place the bowl under a light, near a furnace register.
- If you have a proofing setting on your oven you can use that.
- Cooler room temperature will only cause the dough to rise slower, so if that's the case, just let it sit for another hour or so until it has doubled in volume.
5. Make sure your surface and your fingers are well floured. It is a very sticky dough.
Don't feel like a Reuben? This dense bread is also great served with one of these hearty soups.
Beef Vegetable Barley Soup
Smokey Split Pea Soup
Smokey Kielbasa Cabbage Soup
LindySez: Heating your enameled Dutch oven empty in a hot oven will, over time, discolor the inside enamel coating. While unsightly, it will not affect the pot's performance. With some elbow grease and Bar Keepers Friend, you can get it looking almost like new again.

A Quick No Knead Crusty Rye Bread
Ingredients
- 3 ½ cups flour for the rye bread I used 2 cups all-purpose and 1 ½ cups rye, you could also use whole wheat and white, or all white, up to you
- 2 teaspoons kosher salt
- 1 teaspoon active dry yeast
- 1 ½ cups warm about 100 degrees water, or more as needed
- 2 teaspoons or more caraway seeds optional
Instructions
- In a large bowl stir together the flour, salt and yeast. Add the caraway seeds, if using. Make a well in the center then add the water into the well. Mix, incorporating the water into the flour until you have a very sticky shaggy dough (if the dough seems to dry, add a little more water). Cover with plastic wrap and allow to sit in a warm place for 3 hours.
- Heat the oven to 450º F. Place your enamel Dutch oven and its cover (I used the oval oven, as long as it’s enamel, the bread will NOT stick) in the oven and heat for 30 minutes.
- While the “oven” is heating in the oven; scrape the very sticky dough out onto a well-floured counter with your very well-floured fingers (did I mention the dough is sticky?, well it is). Fold over a few times then form into a ball, sealing the bottom into a seam as best you can. Cover with plastic while you wait for the pot to get hot. Once the pot AND its cover have been in for 30 minutes, CAREFULLY remove, open and drop your ball of dough into the center; cover and return to the oven. Cook for 30 minutes; uncover and cook 10 – 15 minutes more, or until the internal temperature reaches 200 degrees when read with an instant-read thermometer. Or you can use the old knock on the crust and see if it sounds hollow, not exactly the most scientific way, but works most of the time.
- Again, carefully remove the bread from the hot hot pot, and transfer to a cooling rack to cool
Tracy says
Can I use quick rise yeast for this recipe?
Linda Baker says
Yes Tracy, You can substitute instant (rapid-rise) yeast for regular active dry yeast in your LindySez Quick No-Knead Rye Bread with almost no change.
How to substitute. Use the same amount the recipe calls for.Mix the instant yeast directly with the flour. No need to dissolve it in water first.Cheers ~ Lindy
Pat says
I baked this loaf for supper tonight and my husband said it was delicious! I have a question, though. How do I keep the bottom crust from being quite so hard? My husband said that after biting into the bottom crust, he was honestly afraid of cracking a tooth so trimmed off the crust before the next bite. He loved the bread other than that, but I've got to figure that out before making this again. Details: I used King Arthur bread flour because that's all I had-- used proportions white to rye as in recipe. The dough raised just fine. I've made bread for years so am used to the rising process. I used my MagnaLite dutch oven with parchment paper, baking it about 10 minutes with the cover off. I baked at 425 degrees because my Reynolds parchment paper said it was good to 420 degrees. Anything in there I could alter to make the crust a little kinder to teeth?
Linda Baker says
Hi — I’m so glad you enjoyed the bread, and thanks for taking the time to write!
A very hard bottom crust usually comes from too much direct heat from the Dutch oven. A couple of small adjustments should help.
First, try placing the Dutch oven one rack higher in the oven so the bottom isn’t sitting in the hottest part of the oven.
You can also place a small baking sheet on the rack below the Dutch oven while the bread bakes. That acts as a heat buffer and keeps the bottom from getting overly thick or hard.
Another option is to remove the bread from the Dutch oven for the last 5–10 minutes of baking and finish it directly on the oven rack. That allows the crust to finish evenly without continuing to harden on the bottom.
Using bread flour instead of all-purpose can also create a slightly chewier crust because of the higher protein, so that may have contributed a bit as well.
Give one of those tweaks a try next time and see if that softens the bottom crust a little while still keeping that nice crackly top.
Happy baking!
— LindySez 🍞
Pat says
Thanks, I can do all those things! And my husband is quite ready for me to make another loaf!
Linda Baker says
Have fun making it! Cheers ~ Lindy
Pat says
Thanks for the four suggestions of things I could try. I made the bread again today and tried all of them! I used all-purpose flour instead of bread flour. I moved the oven rack higher, and put a cookie sheet under it. And at the end, instead of just removing the lid, I took the loaf out of the pan and set it directly on the oven rack for the last 10 minutes. One other thing I did differently that I should mention-- I used my cast iron pot lined with parchment paper instead of my MagnaLite lined with parchment. I asked my husband to make an assessment, since he was the one who said my initial loaf had a bottom crust that was very difficult to cut. (I am not a fan of rye so wasn't eating any.) He said this loaf was much improved-- he said the bottom crust was about the same thickness as the top crust. So this version gets a thumbs up!
Randy says
I tried your recipe today. I've been making Challah most every week for the last 5 or 6 years, but I love rye bread. It's my bread of choice for Corned beef, pastrami and tuna salad sandwiches. So, I studied several recipes and tips, before settling on yours. I heard that using pickle juice for some of all of the water gave an interesting flavor, so, I added 1/4 cup of pickle juice and added a tbsp of molasses to cut the bitterness (and reduced the water by that much). I mixed everything together using a stand mixer, first adding the flours and yeast, then adding the liquids. after a minute of so, I added the salt (I heard its best to add the salt after the yeast and flours had absorbed the liquid). After rising for 2 hours, it had already doubled in size, so I heated up the oven with the dutch oven inside. My aim wasnt that great and the dough ended up on the side of the dutch oven, but it still came out. After 30 minutes of baking, I removed the lid and let it go for 12 minutes - which was a bit too long. I should have checked it at 9 minutes, and probably removed it then. All and all it turned out well. Thanks.
Linda Baker says
That was quite the journey. Aim is important but not critical as the bread is forgiving. I'm glad you like it. Cheers ~ Lindy
ConnieP says
I made this bread for the first time-bombed out!! After reading a lot of the positive reviews I know I did some or MOST of the instructions incorrectly. I am a novice bread baker, first of all. I used bread flour in place of all purpose. Then added an additional WARMED 1/2 cup of pickle juice to the water. The dough did not double after the first rise and baked FLAT as can be without a nice crust as I had hoped, instead a soft one! PS--I also used DARK RYE. I want to make this again, so PLEASE HELP!! THANKS.
Linda Baker says
Thanks for trying my rye bread! It sounds like you had fun experimenting, but a few things probably caused the flat, soft result. First, using bread flour instead of all-purpose likely changed the dough structure—it absorbs more liquid, which could have tightened your dough instead of keeping it loose and shaggy. Adding pickle juice (especially warm) may have affected both the salt balance and the yeast’s performance. And dark rye absorbs even more liquid and makes a denser dough—so it’s extra important to keep that dough very wet and loose. If it didn’t double in volume, that’s a big sign your yeast may not have activated well, or the dough was too dry or too cool to rise properly. Next time, try it with all-purpose flour, skip the pickle juice, and make sure your water is just warm—not hot. And keep the dough sticky and loose. I’d love to hear how it goes when you give it another shot! Bread baking is a journey—thanks for being on it with me! Cheers ~. Lindy
Judith Humphrys says
I have been making this rye bread for a while now it is delicious! The only thing I do differntly is that I no longer preheat my dutch oven, I just put the dough ball into the Dutch oven put it in the oven and then turn on oven to 450f and bake for about 40 to 45min. with lid on and then. About 10min with lid off. Turns out every time. I also use instant yeast as that is what I have.
Linda Baker says
I'll have to try that as putting the dough into the hot Dutch oven is the hardest part of the recipe. Cheers ~ Lindy
Julia says
This is an easy way to make a delicious rye bread .. I did add more caraway seeds but my partner loves rye bread and this one turned out delicious
Linda Baker says
Thank you Julia for taking the time to post this review. Cheers ~Lindy
wanda says
Can you add sauerkraut or sauerkraut juice?
Linda Baker says
I can't see why you can't add juice. Just don't add more total liquid than the recipe calls for. If adding actual "kraut" I'm not sure but if you try it I would recommend you make sure it is very dry, and please, tell us how it turned out. Cheers ~Lindy
Sonia says
The bread was very tasty, but was spongy. Not sure what I'm doing wrong.
Linda Baker says
Hi Sonia, I'm not sure either because "spongy" is not the usual description for this bread, dense? Yes. Firm? Yes, Spongy? No. Problem is many different things come into play when baking, especially breads. These can include the temperature, the amount of moisture in the air, age of flour, age of yeast, type of stove and accuracy of the temperature...well, a lot of things. As long as it was tasty, try again with different environmental elements and see what happens the next time. Cheers ~ Lindy
Casey LaRosa says
I discovered this recipe during covid, and made it without the rye flour and it is our favorite bread recipe now. I told my sister, and now she makes it too, and loves it. It's fabulous just as it is, but I have even substituted a cup of whole wheat flour and added walnuts, cinnamon and raisins to it. I may add a bit of sugar next time I do that, but it was still great without it. I bet I could add olives and make olive bread!! the texture is perfect, the crust is sublime.
Two things I did that wasn't in the recipe that made it easier to handle the hot pot and improve the rise is that I put a few slits in the the top while waiting for the pot to heat up in the oven, and placed it on parchment paper so it was easier to hold the ends of the paper to rest it in the pot. I didn't do that the first time, and everything still turned out great, but I personally found it an improvement to add these steps.
Really, the best crusty bread ever.
Linda Baker says
Thank you for your comment, and suggestions for variations. I love them! Cheers ~ Lindy
Eileen M Pryor says
It turned out perfect I would like a larger loaf but it’s wonderful.
Not only does it rise well and in fair amount of time I put my Dutch oven on the bbq grill and still came out wonderful.
Used a half cup of pickle type juice and I added some onion powder to make a rye I used to love from the deli.
Just came off the grill it’s cooling I hope it tastes as good as it looks
Linda Baker says
Well, did it? Glad the loaf looked good and interesting additions. I'll have to try those next time. Cheers ~ Lindy
Jim C. says
I made this bread two ways.
First, I followed the recipe. The dough did not double in size; I would guesstimate fifty percent (I used the same rising methods/temperatures I use for white breads that have no problem doubling in size). The end result was a dense loaf about seven inches in diameter.
Second, I mixed the yeast with one teaspoon of sugar, mixed it into the warm water, and let it sit for ten minutes. Then I followed the rest of the recipe. The dough did double in size. The end result was a dense loaf about eight inches in diameter and almost an inch higher.
I cut both loaves down the center. The second method yielded a bread a little more "aerated", but make no mistake, it was still very dense.
That's it. Taste good.
Cindy says
I made this recipe this morning and realized there was no sugar for the yeast to rise so I got nervous that the bread wouldn’t rise so I added a tbsp of liquid honey to the mix and I used 1 1/2 c rye flour, 1 c of whole wheat flour and 1 cup of all purpose flour. It rose beautifully, it’s still in the oven so I haven’t tasted it yet. Had I not used honey this bread would still have rose up? I thought yeast always needed a sweetener.
Linda Baker says
I understand your hesitation, the practice of adding sugar is quite common. But Yeast readily makes its own food supply by transforming flour's starch into sugar. Yes, sugar jump-starts yeast right at the beginning, but yeast dough without sugar will soon catch up. (Google Search) This recipe doesn't require the quick start. Cheers ~ Lindy
Mary L says
great recipe~ I was suspicious about the small amount of yeast, but no reason to worry. I also used 1 cup unbleached, 1 cup whole wheat and the 1-1/2c rye. Delicious! Crusty outside, chewy inside. Will make awesome sandwich bread. THANKS!
Linda Baker says
Thank you so much, glad you enjoyed the recipe. Cheers ~ Lindy
Connie says
Thanks so much for getting back to me - I actually woke up extra early so I was able to do it as directed - my best friend loves this bread and it was a surprise for her so I didn’t want to mess with it. Have a great day.
LindySez says
Thanks for letting me know...and so glad your friend loves the loaves 🙂
Cheers
Connie says
Hello - first off - great bread everyone loves it. Iwas wondering can i make the dough the night before and leave on the counter to rise and then bake first thing in the morning or should i let it rise in the refrigerator overnight? Also what would be the rise time for both ways.
Thanks so much.
LindySez says
Because it's such a short "rise" time I've never actually done this but I would imagine, if you did want to hold it overnight, it would work best in the refrigerator as that would allow it to rise slowly. A slower rise might yield a slightly more "sour" dough. But for me, there's nothing wrong with that! Let me know what you do and how it works for you. Cheers ~ Lindy
michelle says
One additional question please. I have a Merten & Storck german enameled Dutch Oven... different steel than Le Creuset enameled cast iron. Does anyone know if I need to adjust my cooking times?
LindySez says
I really can't say. As the pot is made from a thinner metal it might cook faster, but the only way to know is to try it and check a few minutes earlier than I suggest. Let us know what your results are.
Cheers ~ Lindy
michelle says
More of a question, not a comment because I am a bread making novice for sure. I am in the process of making your recipe right now. 🙂 I have been researching Jewish/New York Rye in an attempt to successfully make one. there are some recipes that say pickle juice is the magic secret ingredient for true rye, but there a just as many that dont even mention pickle juice. what's your thoughts? or anyones thoughts really. I'm trying to figure out how to get/make that loaf of really dense chewy rye I miss from Philadelphia delis
LindySez says
Hi Michelle, This bread is very dense and has a good chew. As far as the pickle juice, some have commented they added some, it's more for a favor than a texture. So if you want to have a pickle juice tang to your loaf, then sure, add some juice.If not, leave the recipe as is. Either way it should give you the dense bread you crave. Cheers ~ Lindy
Connie says
Hello - I made this rye bread over the weekend, it was my first ever rye bread - WOW - it was super easy and incredibly tasty. My company loved it and I have now passed the recipe to several of the guest that had it over the weekend.
LindySez says
Hello, so glad you liked it. Thank you so much for taking the time to check in with this positive feedback. It's always nice to know how a recipe has been received. Have a great day! Cheers ~ Lindy
Ed D. says
outstanding rye bread. best I've ever eaten.
at the suggestion of my wife, I substituted 1 cu of whole wheat flour for AP. It didn't work. The presence of the whole wheat flour diluted the intensity of the dark rye flour. It was good, but not nearly as good as just following the recipe.
LindySez says
Thanks for sharing your experience. Getting "healthier" isn't always "tastier" ...Cheers ~ Lindy
your mom says
FREAKIN perfect!!! So crusty on outside, soft inside. You are right, super messy dough. I might add touch more salt, but everything else... The directions and methods, spot on!!!!!!
LindySez says
Hooray! That's what I like to hear... thank you for taking the time to provide feedback. Cheers ~ Lindy
Jane says
Really easy, and first rate loaf of bread has resulted! Subbed pickle juice for 2/3 of the water and otherwise made as written. Boule has a great crust and a lovely interior - chewy with beautiful open structure. Thanks for this recipe! It'll be a standard going forward for us!
Linda Baker says
So glad it turned out well for you. You are the second person who used pickle juice, I'm going to have to try that. Cheers ~ Linsy
Matt says
Smells fantastic--especially the combination of rye flour and caraway. It didn't rise as much as I had expected, so I am a bit worried it's going to be too dense. I used AP flour. I may try to experiment with wheat gluten depending on how it is when I eat it tomorrow.
Matt says
Tasted fantastic. After speaking with friends, I get now that rye bread does not rise as much. I was expecting a bigger loaf, so what I am thinking of trying is doubling the recipe, letting the dough rise overnight, and then refrigerating half of it to bake later in the week. I will let you know how it goes. I'm hoping to get a little bit of the "sour" effect in the second loaf. I made the recipe exactly as stated, although I used coarse sea salt instead of Kosher salt and I was definitely very generous with the caraway seeds (I bought a HUGE container for $3.50, so I feel no need to conserve :).
LindySez says
Matt, thanks for checking back in with the results. I love hearing what you do and how it works out. Cooking, it's always a lesson. Cheers ~ Lindy
Matt says
Will using bread flour really make the loaf noticeably less dense? I was thinking of buying a bag of wheat gluten to make my own "on-demand" bread flour, but if the result is not going to be noticeably better, I may just save my money (I am trying to minimize storage space, so I'd rather not have to keep two large bags of flour--bread and AP).
Kathy E says
Made this rye bread following your directions and used about 1/3 cup dill pickle juice as part of the liquid, but ground up my carraway seeds (hubby doesn’t like them). It is excellent!!! I put it in a metal loaf pan and used a second one as a top. The texture is perfect and taste is divine! Definitely a keeper. Thanks for sharing!
Linda Baker says
Interestin technique. I'll have to check it out. I assume heavy loaf pan? Cheers ~Lindy
Tim Breen says
How is it possible everyone else got good results? Isn’t it a given that salt kills yeast, yet recipe says to add/mix flour, yeast, and salt all together, no? Also, doesn’t active yeast need to bloom w/ the water for a while before mixing w/ the dry? Guess what I got w/ this recipe? Goop for the trash can.
LindySez says
Gee Tim, I'm sorry it didn't work for you...not sure why as you can see many others have made it, myself included, with great results. The dough is very loose and sticky, so maybe you didn't finish it? Again, sorry. Not sure what happened. Cheers ~ Lindy
Jeanne says
I would like to make rye bread in my Dutch oven and have a question. Can you let the dough rise for 12 or more hours? Fortunately, I have the time for that. Thank you!
LindySez says
To be honest, I haven't tried it for that long, but when I was researching the recipe many did rise for 12 hours. My understanding is the longer rise time resulted in a more sour dough. Good luck and if you try it, let me know how it turned out. Cheers ~ Lindy
Ed says
The recipe turns out excellently nearly each time. It's the best rye bread I've ever had. Dense interior, crusty outside. Definitely use caraway seeds. I use just over two tablespoons. And one of the big surprises to me was that it never, ever sticks to the oven.
Whatever you do, don't use too much salt. I used slightly more than a full two teaspoons of fine salt and it was too much. Instead, I use a slightly short of 2 teaspoons. You don't need kosher salt.
Louise Kronkow says
Can you use Gluten Free Flour in this recipe?
LindySez says
I would assume so. It's more method than ingredient and gluten-free flour has come a long way in mimicking flour with gluten. Try it. Let me know 🙂
Michelle says
Love this bread! Followed the recipe the 1st time and we loved it, then I started my usual wondering how it would taste like this train of thought. So the next time I did the flour the way you said for rye, but instead of all water, I used 1c water & 1/2 c sauerkraut juice, and added about 1/2 c kraut. The rest is all the same. Oh my, we ate the whole loaf in 2 days! Thanks for the awesome recipe!!
LindySez says
Wow, kraut juice and added kraut would be interesting to try. I'll have to do that sometime. Thanks for sharing. Cheers ~ Lindy
wallace baisden says
is it rye bread or white bread? it ain't rye bread if it has all-purpose flour in it!
LindySez says
Wallace, I totally disagree with you. Look at most any rye bread recipe and you will find that they use more white flour than rye flour in them. 100% rye flour would create a very dense loaf and I think overload the flavor. But you can make yours 100% rye flour if you choose. That's the joy of cooking. Make it your way. Cheers and thanks for commenting.
Suzanne says
WOW!! My first attempt at no-knead rye and it is excellent! Hubby says the search is done as this recipe is perfect! I followed ingredient list. Used Corningwear casserole/Dutch oven with glass lid. I lightly oiled the inside and used a parchment strip to lift dough in and out of casserole dish. A few technique adaptations:
~ After dough was mixed and in a ball, I drizzled 1 tbsp oil into the bowl. I lifted the ball edges with a silicone spatula so oil would go under then swirled the bowl around so dough ball was covered in oil. This is a trick my mom used so it's easier to get out of the bowl.
~ My oven runs a little hot so I lowered the second temp by 25*F (I have an oven thermometer. I also used a digital thermometer to check loaf was 205*F internally)
~ I used fresh ground caraway as hubby doesn't like seeds
Next time I shall:
~ add extra tsp ground caraway
~ add 1 tbsp vinegar to proofed yeast/water before mixing
~ add 1 tsp baking soda to dry ingredients
(Vinegar and baking soda for extra lift and taste.)
Thank you, again, for posting this! I grew up eating authentic steam-oven WINNPEG RYE BREAD in Winnipeg, Manitoba from the originating bakery. This crust is closest I've ever had! Will try a glaze in the future. I have several types of arthritis and can no longer knead dough so this is ideal! I look forward to passing this recipe on!
Suzann in Kelowna, BC, Canada
LindySez says
WOW Suzann, thanks for writing up such a great review and highlighting your changes. Glad it worked! When you do it again, with your proposed changes, I look forward to hearing how it all turned out. Please check back. Cheers ~ Lindy
Dawn says
Hello
Made this today. I have had a bit of trouble with some of the previous loaves I have made--didn't rise right, did not like the taste. This loaf is PERFECT! Perfect in everyway. I followed instructions exactly--checked temperature of water, sifted flour and weighed, proof'd in the oven for exactly the right time. I did add three teaspoons of caraway seed and put some on top. The taste is amazing. The texture is perfect for Rye bread, and the crust was crusty. Sent photos to my kids with each step. Then I enjoyed it with an asian salad, topped with kebalsha. WOW! A five star meal. Thank you for the detailed instructions on a wonderful recipe. So Easy.
LindySez says
Thank you for your kind words. So glad it turned out well for you. Cheers Lindy
David Baird says
Finally had the chance to do the rye bread and everyone enjoyed the result. I did a 50/50 pumpernickel and dark rye flour with my all purpose in the quantity per recipe. I did add 2 tablespoons Vital wheat gluten, substituted 1/4th cup dill pickle juice from the 1 1/2 water. I did need to add 3 tablespoons of water due to low humidity here. Everything else as per recipe. The loaf bounced beautifully and finished up looking like your picture. I will do this recipe again and the only change I'll make is substitute 1/2 cup pickle juice for a bit more tang. Otherwise very pleased with the result.
LindySez says
Glad you finally had a chance to make the bread...and that the result was good. I'm going to try it with the pickle juice.
David Baird says
Plan on giving this a try this weekend. Have been making a New York Deli rye that hasn't turned out as well as I'd like, not enough bounce. I have a large Dutch Oven and will double the ingredients. To try and get a similar flavor I plan on substituting some water with pickle juice and some flour with Vital Wheat Gluten as my rye flour will be Pumpernickel.
LindySez says
Let me know how it turns out. The pickle juice is an interesting touch. Cheers
Mary P. Brown says
Unfortunately two fails - one a cannonball the other flat - though the flat one was tasty 🙂 I don't know what went wrong. I have been making NK sourdough bread for years. This was my first time using rye flour...... I don't know, but I will give it another go. 🙂
LindySez says
I am so sorry to hear this...rye flour shouldn't make that much difference, except for in flavor...I'm thinking perhaps your yeast was dead? Did you proof it? Anyway...I do hope you try again as there have been many successes including my own when making this recipe. Let me know if you get the result you want. Cheers ~ Lindy
Mary Lou says
Some of the comments are overlapping and cannot be read. Please check. I have made this style of bread with great success. I am now trying the rye version!
LindySez says
Hi Mary Lou, thanks for writing. I know this, it happened when we converted to responsive design and while I can cook, I can't figure out how to fix this issue. Hope the bread turned out well! Cheers ~ Lindy
Gramma Di says
I love this recipe VERY much and made it often but I would like to be able to print it but it doesn't seem possible. Any way that could be an option? Sometimes our interest connection is out and I can't access the recipe. Hope you can help.
Thanks in advance
LindySez says
Hey Gramma Di, thanks for the kind words. You should be able to print the recipe by hitting the print icon at the bottom of the recipe post, or now also at the top. It's an icon that is light green and looks like it has a raindrop on it? Hope that helps. Cheers and enjoy the bread. ~ Lindy
Virginia Burgess says
What a fabulous recipe!! Have made many times... feel like a pro (but it is sooo easy!) Thank you so much for this.
Wholemeal flour used... loved the taste! Used a pottery dish with aluminium foil as a lid... worked perfectly! 🙂
LindySez says
Virginia, thank you so much for taking the time to not only comment, but share how you cooked the bread. It's nice for everyone to know there are options if they don't have the exact right equipment. I'm so glad it worked! Cheers ~ Lindy
Poryb says
I am waiting on the pot to heat in the oven, but I timed it so I could put the dough directly in after shaping it past the first rise. Am I supposed to let it rise a second time for 30 minutes?
LindySez says
Hi Poryb, I happen to be on-line so I can answer you right away...the pot needs about 30 minutes to fully heat, the dough should be ready at about the same time, so I think you are good to go. Once the pot has heated, toss the ball in and close it up...it should finish in the pot...cheers - Lindy
Poryb says
Wow! Such service! I think I wasn't clear, though. The first rise is 3 hours. After 2.5 hours I put the empty pot in the oven. Because I thought I could put the dough directly in the pot after shaping. But, it seems from your comment and the original recipe that the dough is meant to rise 30 minutes after shaping. Is this correct? As it is, I've decided to let it rise 30 minutes, just in case. But, I still want to hear your thoughts. Thanks, Lindy!
LindySez says
Yes, you were right. You want to wait until the dough has been shaped, then stick the pot in the oven, so I guess in saying that, it would have a "second" rise. Just not as long as the first rise. OK? Is that as clear as mud?...how did it turn out since it seems you did it the right way...
Gramma Di says
My daughter has been experimenting with lots of different breads and passed this recipe on to me..........SO glad she did. We love, love, love this bread. I am making my second one as I write and can't wait to eat some. This time I doubled the caraway seeds because I love them so much. Hope it wasn't a mistake. Thank you!
LindySez says
Thank you so much for stopping by and letting me know you loved the bread...I say caraway away to your own taste and delish...sometimes I add more too.
Cheers
Sharon says
You use only part rye flour? how would it turn out if you used all rye flour? Might the flavor be too intense?
LindySez says
Hi Sharon, and thanks for the question...I think it's a good ratio of rye flavor, but I suppose if you wanted it more so you could increase the amount of rye flour. My rye and all-purpose have about the same texture, but I'm not sure if the loaf would be denser using more of the rye flour. If you do this, let me know how it turns out! Cheers ~ Lindy
JL says
Cooking is chemistry, whether one realizes it or not. One has to understand what is going on.
Rye flour has NO gluten to make it rise. It is my understanding that if you want a brick instead of a loaf of bread, you'd only use rye flour.
I use King Arthur Flour Bread flour--has a higher protein content as my secondary flour to supply the gluten. The quality of the flour product depends upon the quality of the seed, where it's grown, etc. Used quality flours affects how the bread rises, as well as tastes.
These are informative books my kitchen has:
1) The Baking Book--by Lloyd Moxon; Culinary Arts Institute
2) Cookwise--by Shirley O. Corriher
30 How Cooking Works--by Sylvia Rosenthal and Fran Shinagel
4) The Bread Bible--by Rose Levy Beranbaum
Hope the above gets everyone on the path to enlightenment.
LindySez says
I agree about the flour, I did some experiments with the flour(s) and found some rather surprising results, bread flour does make the bread a bit softer, but it's still a dense bread, so if one is looking for "light and fluffy" this is not it. But Rye flour does contain gluten (Rye is one of the three gluten grains. It contains a protein called secalin, which is a form of gluten.) Cheers
vodik says
Thank you for the recipe. Made rye bread, everybody loved it.
Have tow questions.
1. I wonder what is approximate diameter of your fully cooked loaf.
Mine was about 6.5 inches.
2. Did you ever try to increase proportionally amount of ingredients.
Thanks.
LindySez says
Hi Vodik, funny, I never measured my loaf, but I would say that is about right, somewhere around 7 inches is what I think.I'll pay more attention next time 🙂 I have never increased the ingredients to make a bigger loaf. Since there is always room in the Dutch oven I don't think (that's a think) space would be a problem, but cooking time would have to be adjusted. Let me know if you try it, and how it turns out. Cheers ~ Lindy
Laurie says
I use to get rye bread breadsticks from a German bakery which is no longer here. They were the best. Crusty on the outside chewy on the inside with salt on top. I been looking for a recipe to make some but hadn’t found a recipe that sounded right till this crusty chewy bread do you think this could be made into breadsticks? Laurie
LindySez says
Hi Laurie, I don't think this recipe would work for those so well as it's very unstructured and loose. I would recommend something more like this to replicate what you are trying to get https://cooking.nytimes.com/recipes/1013637-rye-caraway-breadsticks. Hope that helps. Cheers ~Lindy
angela clark says
What size Dutch oven you have to use?
LindySez says
Angela - The one I usually use is 10 inches across the top, but I've used a larger one and slightly smaller one as well. I also have used an oblong pot. As long as the bread does not touch the sides once you place it inside the pot, I think you would be good to go. Cheers ~ Lindy
Nicole says
This is great! Tried it today. Super crunchy on the outside, soft on the inside. Next time I'll add more caraway.
LindySez says
So glad you stopped by Nicole. I like extra caraway sometimes too. It's so easy to add your own personal touches. Cheers - Lindy
Moxi says
Great recipe - This is basically the same recipe I've been using for years. My German Hubby loves his rye bread! I use regular old Fleischmann's ADY, and a 10" Lodge cast iron dutch oven (no feet, for conventional ovens). One quick tip that I haven't seen mentioned, is that after kneading into a ball, I place the dough on a sheet of parchment paper and set it in a large Pyrexmixing bowl (9" dia) for the second rise. I just trim off any overhanging paper (corners) and cover the bowl. The bowl helps keep the round shape, and the parchment makes it easier and safer to transfer the loaf to and from the hot Dutch oven. Just be sure the brand of parchment can stand the higher oven temps.
LindySez says
Thanks for stopping by Moxi...I like the parchment paper idea, it's always kind of intimidating dropping the ball of dough into the hot pot, so I will try it next time I make this recipe. Cheers ~ Lindy
Galen says
Let me start off by saying that I do not have a heavy cast iron enameled Dutch oven to cook in but rather a thin walled steel enameled pot so I was up against the odds. However what I did have was a pizza stone that was fairly thick so I pre-heated the thin walled pot resting on top of the pizza stone. In the end it came out fabulous. The pizza stone (just a large unglazed tile from the local landscaping supply store) radiated the heat and kept the temp high. Using the recipe as directed, it came out fairly great. Nice crust and the texture was less chewy which is better with a 'wetter than usual' dough. This may be due to the 3 hr rise time rather than the 12 - 18 hr no kneed recipes where gluten has more time to develop but you will not miss it. Thanks for sharing this recipe. Here in Spain cast iron is not easy nor cheap to come by. On a side note, I plopped my dough into the pot very clumsily and it fell awkwardly lop sided, not at all like I wanted it to. Still came out beautiful and rustic. If people complain about a dense or tough loaf, you may wish to replace your yeast as when some of it dies, it impedes the ability to create CO2 if not enough survived to keep going.
LindySez says
I'm so glad it worked, and yes, even if you don't get the dough in exactly right, which is hard when the pot is so hot, it does work itself out. I know how difficult and expensive pots can be, especially in Spain and Italy. I love some of the cookware you have that is hard to come by here in the states. Thanks for writing. Cheers ~ Lindy
Katherine says
Hmmm... results were interesting!
Didn't rise much in the oven, and it took an extra 15 min to bake. The result was surprisingly light though. I'm tempted to try your 3 hr proof method right now so I can do a side-by-side comparison.
Katherine says
Fascinating! I've never been able to get a bread to rise with ADY and no sugar. I stumbled upon your recipe because I was checking to see if one needs to make any other adjustments to the basic no-knead recipe for rye bread (I've been making it with red fife wheat so far). I used instant yeast just let mine ferment overnight and it rose beautifully, but noticed that it really didn't rise the second proof. I'ts in the oven now so I'm now REALLY curious to see how it turns out!
LindySez says
Let me know how it turns out! I made it a several times, and find variances but nothing dramatic. Fermenting overnight will give it a bit more sour flavor from what I've read, but it should still be good. Cheers!
Corene says
I've attempted this recipe twice now and followed it down to the letter, including measuring the temperature of the water. My dough never really rises and the loaves, while tasty, are very very dense. I am not sure what I am doing wrong. What constitutes "shaggy" dough? Also, you say the dough is sticky, but mine really isn't. It's actually kind of dry. But, if I add more water, it is not "shaggy." Could you perhaps post a photo of what the dough is suppose to look like before and after it proofs? Thanks!
LindySez says
Hi Corene, I'm so sorry your bread isn't working for you. I don't know exactly what the problem might be, but it could be the flour. I use King Arthur flour which is very soft, a harder flour might absorb more of the water? My dough was very wet, shaggy meaning that it looked almost not dough like at all, but more like drop biscuit dough (I guess it's hard to explain in words). I've been meaning to make a video of this recipe, so I guess it's high time I get it done.
Scott says
Made my first loaf today. It was pretty good but a bit dense. Maybe I didn't heat the pot enough? Without sugar, what activates the yeast? Mine didn't rise much but I let it sit in a giant bowl and it just sort of spread out.
LindySez says
Hi Scott. Sorry your first effort wasn't exactly right. I think heating the pot properly is a key element to making the dough rise, it's pretty wet, so I think the "steam" it creates in the pot is what gives it that lift. And you are right, normally you would put yeast and sugar together but in this recipe, that I researched well, it doesn't have any. I hope you try again! Cheers
Katherine says
Lindy,
I think some of your readers may be having trouble with this bread because I noticed you listed active dry yeast as opposed to instant yeast, which is what is typically used in no-knead doughs because instant yeast doesn't require that sugar starter. Also, the hot water may actually be killing the yeast.
Hope that helps.
LindySez says
Hi Katherine, Well, I do use an active dry yeast in the bread dough, Fleishmann's Active Dry Yeast to be specific and their recommendation is for the water to be at between 100 and 110º F... I did review other no knead recipes for other types of breads and found that they did not use sugar either. I think that flour, humidity, elevation, may be more of the influence for the failures...or they might just be adding too much flour to compensate for the shaggy wet dough. It's hard to tell when one is not in the kitchen with them right? Thanks for your interest and comments.
Dina says
Thank you for posting this recipe! I will try. Do you think subsituting room temperature kefir for some of the water would result in an acceptable loaf. thank you
LindySez says
Dina, to be honest, I'm not sure. Not sure why you would want to do that either...but if you do do it, please report back on how it turned out. I'm very curious to find out. Cheers ~ Lindy
Tena says
Can I use spelt in place of the white flour? I'm doing Trim Healthy Mama.
LindySez says
While I'm not a flour expert, I did a little research and yes, you could use spelt in place of white flour, but you may need to adjust the liquid to flour ratio as spelt absorbs water differently. Let me know how it turns out. Cheers ~ Lindy
Scott says
I've heard that in order to get a "crusty" bread, the secret is to pour a small amount of water in the bottom of the oven at some point to create steam. Is this what the covered pot does?
LindySez says
Hi Scott...I've read that too. I think that with the dough being a little more 'wet' to start and the hot environment from the hot heavy pot, which probably creates steam, it works the same. All I can really say is, it works and this bread makes a nice crusty top.
Mary Ann says
Hi Lindy,
Do you have to slash the top of the loaf before your put it in the oven?
Mary Ann
LindySez says
Nope, just plop and drop. It does the rest on its own. Cheers ~ Lindy
Jo says
I love the simplicity of this recipe and found I needed to make some simple adaptions -
I upped the temp to 475 and made a x slash on the top before baking.
Then lessened the time to 20 + 12 minutes.
Seemed to be my sweet spot for a lovely loaf.
Ed says
I tried the rye and it came out very dense. I prefer a rye with a chewy crust and very light inside. Any ideas?
LindySez says
Hi Ed, I'm sorry your's didn't turn out so well, mine was very crusty and light, not dense at all. All I can think is the pot wasn't hot enough before you put the dough in, or the dough wasn't shaggy enough, maybe added a bit too much flour trying to make it look like regular bread dough? It's a fairly loose dough. Other than that, I'm not sure. I hope you try it again. If you do, let me know how it works out for you. Cheers ~ Lindy
Kelly says
Thank you for this! I'm not entirely sure why this worked without really changing the ingredients, but I got a fantastic rise at 3 hours! I did let time get away from me, so it rose for an additional hour and a half, but it didn't flatten. Both loaves turned out so good and I'm stoked that I can now make more bread with wholesome ingredients for less money :)))
Elle says
Is there anything you can't do Linda? You impress the heck out of me.
LindySez says
I don't make homemade pasta…yet...
Jessica says
Looks yummy! Thanks for sharing!
Cher says
I love bread and am always looking for a great bread recipe! Thank you so much for sharing, Linda!
Joanne says
What would be the alternative if you don't have an enameled Dutch Oven?
Thank you,
Joanne
LindySez says
Hi Joanne, If you don't have an enameled Dutch oven, I think a well seasoned cast iron Dutch oven would work. It needs to be very thick to hold the heat so no thin sided pot would work unfortunately. ~ Cheers
Donna says
Hi, just made it with an old smaller version crockpot insert. It is only 6" diameter on the bottom and just the right size for a loaf of bread. If I can I will post a pix of it. Came out great on my first attempt. Followed the instructions with no deviations.
LindySez says
Wow! Just the insert with a glass lid? That is so cool, and goes to show, unless one thinks out of the box, one will never know if it works or not. thanks so much for sharing. Cheers ~ Lindy
Emily says
I have made this three times now as rye bread. It's simple, foolproof, largely hands-off, and tastes great. Will try in the future as white bread!
LindySez says
Thanks for stopping by Emily. I know, huh? And with what they charge in the grocery stores for good crusty bread, it's a bargain to boot! Cheers ~ Lindy
Jon says
Yep! A winner loaf I made...Last Saturday. This is only my third attempt ever at making a rye bread (or any bread) The 1st 2 attempts using other recipes/methods was a bust. First loaf was more of a cannonball, Second loaf was more like pita. And then this loaf? Voila! It worked ! and it did not make it thru last Sunday's breakfast. So guess what I am doing right now?
LindySez says
Thanks for the comment Jon and so glad it worked out. Yep, fresh warm bread from the oven is just heavenly! Cheers ~ Lindy
Judy Miranda says
Your crusty bread recipe looks yummy. But, any chance your can use a darker font on your site? The gray is hard to read. Maybe a shade darker. Thanks.
LindySez says
Hi Judy, I'll check with my designer.
Allison says
I baked a rock!
I normally do not post negative comments, but I knew better than to believe this would turn out well. I’ve baked bread for years, and 1 tsp of yeast with this combination of 3.5 cups of flour, even with 3 hours of proofing, didn’t work for me. I used the exact ingredients as the author.
Linda Baker says
I'm sorry it didn't work out for you. As you can see by the many comments that for many it did work. It is intended as a dense bread but not rock bread. As you said, you bake a lot and as you know when baking many environmental issues can affect the outcome. Cheers ~ Lindy
LindySez says
Judy...done...hope it helps...